Are you still using Windows 7 and looking to make the most of your computing experience? Look no further! In this guide, we’ll explore the process to upgrade from Windows 7 to Windows 10.
Upgrading to Windows 10 not only ensures that you stay up to date with the latest advanced features but also guarantees continued support and security updates from Microsoft. Whether you’re a casual user, a business professional, or a creative enthusiast, Windows 10 provides a solid foundation for all your computing needs.
In this guide, we’ll take you through the step-by-step process of upgrading your operating system. We’ll cover everything from system requirements and data backup to the actual installation procedure, ensuring a smooth transition to Windows 10. Let’s get started!
Upgrade Windows 7 to Windows 10
We have divided the entire upgrading process into several simple steps, so you would upgrade your OS easily. Here is a quick look at what we did:
- Pre-requisites
- Download Windows 10 ISO
- Create a bootable media of Windows 10
- Upgrade Windows to Windows 10
Step 1: Pre-requisites
Before proceeding with the upgrade from Windows 7 to Windows 10, there are a few prerequisites that you should consider. These prerequisites will help ensure a smooth and successful transition to the new operating system. Here are some key points to keep in mind:
1. Check system requirements: Verify that your computer meets the minimum system requirements for Windows 10. These typically include a compatible processor, sufficient RAM, available storage space, and a compatible graphics card. You can find the detailed system requirements on the Microsoft website or refer to the Windows 10 documentation. Check Windows System Requirements here.
2. Backup your data: It is crucial to back up all your important files, documents, and settings before initiating the upgrade process. This will protect your data in case of any unforeseen issues during the upgrade. Consider using an external hard drive, cloud storage, or any other reliable backup method to ensure the safety of your files.
3. Update software and drivers: Prior to the upgrade, make sure to update your current software applications and device drivers to their latest versions. This will help ensure compatibility with Windows 10 and avoid any potential conflicts or issues.
4. Make a note of product keys: If you have product keys for any licensed software installed on your Windows 7 system, it’s advisable to keep a record of them. This will make it easier to reactivate your software applications after the upgrade.
By addressing these prerequisites, you will be better prepared for a successful upgrade of your OS. Take the necessary steps to ensure a smooth transition and enjoy the benefits of the latest and most advanced operating system from Microsoft.
Step 2: Download Windows 10 ISO
After completing the step above, you are going to download Windows 10 ISO file. For this, you can download Windows 10 ISO file from the Official Microsoft site or use this link. As this link will take you to a direct link to download a Windows ISO file from Dumbfile.
No matter which one you choose, make sure the setup file is not corrupt or infected. While downloading also make sure to select the correct edition and language that you want to install. Then you will download the ISO and continue to the next step.
Step 3: Create a bootable media of Windows 10
Now you are going to create a bootable media of Windows 10 using Rufus:
1. Download Rufus: Download the latest version of Rufus compatible with your operating system.
2. Connect your USB drive: Plug in a USB flash drive with sufficient storage capacity (at least 8GB) into your computer. Please note that all data on the USB drive will be erased during the process, so ensure you have backed up any important files.
3. Run Rufus: Open Rufus, which you downloaded in step 1. You may be prompted for administrative privileges.
4. Select the USB drive: In the Rufus interface, under the Device section, choose your USB drive from the dropdown menu. Make sure you have selected the correct drive as all data on it will be deleted.
5. Select the Windows 10 ISO: In the Boot selection section, click on the Select button and navigate to the location where you saved the Windows 10 ISO file. Select the ISO file and click Open to load it in Rufus.
6. Choose partition scheme and target system type: Under the Partition scheme section, select MBR if your computer uses BIOS, or GPT if it uses UEFI. If you’re not sure, you can check your computer’s documentation or consult the manufacturer’s website. For the File system, choose NTFS for better compatibility.
7. Configure Rufus settings: You can leave most settings in Rufus at their default values. However, if you want to assign a custom volume label or enable any additional options, you can make those changes.
8. Create the bootable media: Once you have verified all the settings, click the Start button in Rufus. You’ll see a warning that all data on the USB drive will be destroyed. Confirm by clicking OK to begin the process.
Rufus will format the USB drive and copy the Windows 10 installation files onto it. The process may take some time, so be patient.
Step 4: Upgrade Windows to Windows 10
Reaching here means, you have completed half of the work. From now on, you are going to do the easy work.
NOTE: Before proceeding with the upgrade, it is crucial to back up all your important files, documents, and settings. This ensures that your data is safe in case of any unforeseen issues during the upgrade process.
Insert the bootable USB drive: Plug the bootable USB drive into a USB port on your computer.
Enter the boot menu: During the restart process, your computer’s manufacturer may display a message indicating which key to press to enter the boot menu. Common keys include F12, F10, or Esc. Press the designated key to access the boot menu.
Install Windows 10: Your computer should now boot from the USB drive, and the Windows 10 installation process will begin. Follow the on-screen instructions to complete the installation.
Install Windows 10 on your PC
Your computer will now boot from the USB drive and load the Windows 10 installation environment. Follow the on-screen instructions to begin the installation process.
During the installation process, you will be prompted to choose various options such as language preferences, license agreement, and installation type. Make the appropriate selections and proceed.
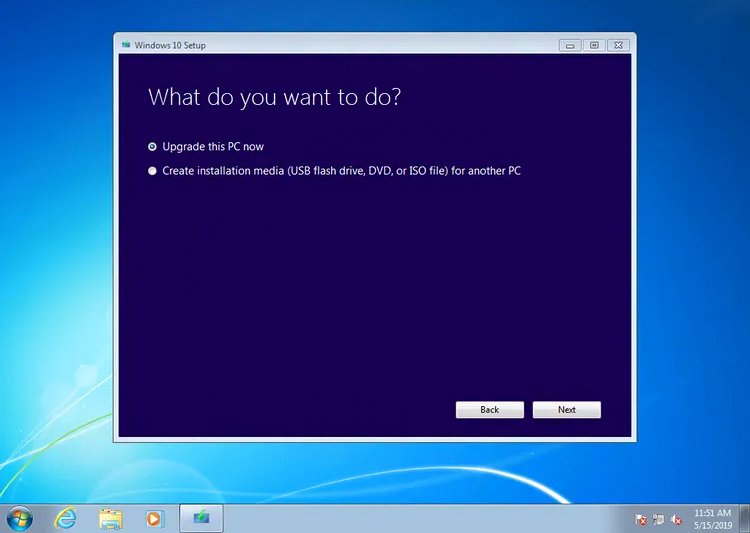
In the installation process, you will have the option to either upgrade your current version of Windows or perform a clean installation. Choose the Upgrade option to keep your files, settings, and applications intact. If you prefer a clean installation, select the corresponding option and follow the instructions.
Windows 10 will guide you through the remaining installation steps. These may include configuring regional settings, creating a user account, and customizing additional settings. Provide the required information and follow the prompts until the installation is complete.
Once the installation is finished, Windows 10 will finalize the setup process. You may be prompted to sign in with your Microsoft account, set up privacy preferences, and configure additional settings.
Now you have fully running Windows 10 on your PC.
Bonus: Additional Tasks
After the upgrade, restore your backed-up data to the appropriate locations on your new Windows 10 system. Reinstall any applications that were not carried over during the upgrade process.
By following these steps, you have upgraded your Windows 7 to Windows 10 using a bootable USB drive.
QnA
Can I upgrade from Windows 7 to Windows 10 for free?
No, the free upgrade offer from Windows 7 & Windows 8.1 users to Windows 10 ended on July 29, 2016. You’ll need to purchase a Windows 10 license to upgrade from Windows 7.
What are the system requirements for upgrading to Windows 10?
The minimum system requirements for upgrading to Windows 10 include a 1 GHz or faster processor, 1 GB of RAM for 32-bit or 2 GB for 64-bit, 16 GB of available hard disk space for 32-bit or 20 GB for 64-bit, a DirectX 9 graphics card, and a display with a resolution of at least 800×600 pixels.
How long does it take to upgrade from Windows 7 to Windows 10?
The time it takes to upgrade from Windows 7 to Windows 10 varies depending on factors such as the speed of your computer, the amount of data being transferred, and the complexity of your system. On average, the upgrade process can take anywhere from 1 to 3 hours.