Are you using Windows XP and want to upgrade? Well, this will help as we are going to upgrade Windows XP to Windows 11 and you can too by just following the steps given.
Upgrade Windows XP to Windows 11
There is no direct upgrade path to upgrade from Windows XP to Windows 11 or even earlier versions like Windows 10 or Windows 8.1. The only way to upgrade your system is to perform a clean installation.
Performing clean installation is proved quite handy in terms of performance, stability, and even security. However; you might find the installation a little bit extended as compared to a direct upgrade. Anyhow here are the steps.
But first, check if you have all the specs to run Windows 11 on your PC.
Step 1: Back up all files
Backing up your files is crucial for protecting your important data. Start by identifying the files you want to back up, such as documents, photos, and videos. Then choose a backup method that suits your needs, such as using an external hard drive, cloud storage service, or network-attached storage.
Copy or upload your files to the backup destination, ensuring a successful transfer. Don’t forget to verify that your backups are complete and accessible.
Step 2: Create a bootable USB of Windows 11
To create a bootable USB of Windows 11 using Rufus, follow these steps:
- Visit the link and download the latest version of Rufus.
- Make sure you have the Windows 11 ISO file. You can download it from the Microsoft website or from Dumbfile for free.
- Insert a USB drive with sufficient storage capacity into your computer. Make sure the USB drive is at least 8 GB in storage size.
Note that all data on the USB drive will be erased during the process, so ensure you have a backup of any important files.
- Launch the Rufus application that you downloaded.
- In Rufus, under the Device section, choose your USB drive from the dropdown menu. Make sure you select the correct USB drive, as all data on it will be deleted.
- Under the Boot selection section, click on the Select button and browse to the location where you saved the Windows 11 ISO file. Select the ISO file.
- Set the partition scheme and file system here. Leave the partition scheme as MBR unless you have specific requirements. For the file system, select NTFS for better compatibility and support for larger file sizes.
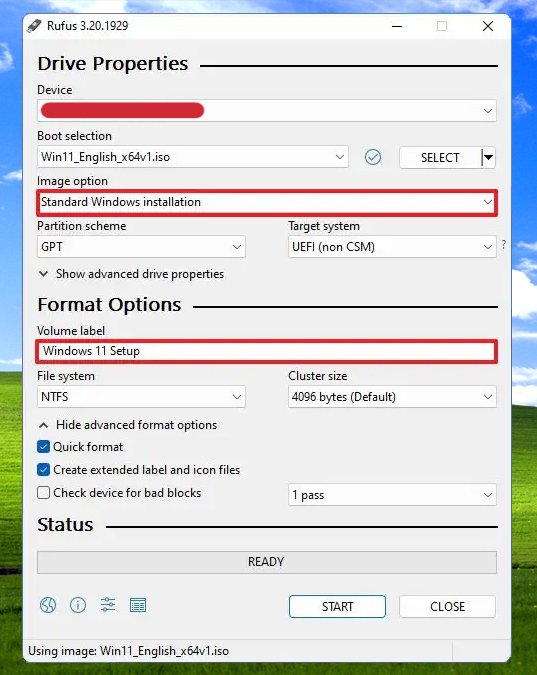
- Click on the Start button in Rufus to initiate the process.
A warning will appear, stating that all data on the USB drive will be destroyed. Double-check that you have backed up any important data and click OK to proceed.
- Rufus will format the USB drive and copy the Windows 11 ISO contents to the drive. The process may take some time.
Once Rufus has finished creating the bootable USB, restart your computer and enter the BIOS/UEFI settings. Configure the boot order to prioritize the USB drive, enabling you to boot from it.
Step 3: Install Windows 11 on your PC
To install Windows 11 on your PC, follow these step-by-step instructions:

- Insert the bootable USB or DVD containing the Windows 11 installation files into your PC.
- Restart your computer and boot from the installation media. If prompted, press any key to start the installation process.
- Select your desired language, time, and currency format, as well as the keyboard layout. Click Next to continue.
- On the Windows 11 setup screen, click the Install Now button to begin the installation process.
- If prompted, enter the product key for your licensed copy of Windows 11. If you don’t have a key, you can select the I don’t have a product key option, and Windows 11 will still install, but you may need to activate it later.
- Read and accept the license terms by checking the box, then click Next.
- Choose the installation type: Select the installation type you prefer. You can either perform a clean installation by selecting a custom installation, which will remove all existing data on the selected drive, or choose the upgrade option if you’re upgrading from a previous version of Windows.
You can’t select the Upgrade option. Instead, you will choose Custom installation.
- Chose custom installation, and select the drive and partition where you want to install Windows 11. You will format the partition to remove existing data. Click Next to proceed. Windows 11 will now be installed on your PC. The installation process may take some time, and your computer may restart multiple times during this process.
Step 4: Set up Windows 11
Now you will personalize your Windows 11.
After the installation completes, your PC will restart, and you’ll be prompted to personalize your settings. This includes choosing a region, signing in with a Microsoft account or creating a local account, and configuring privacy settings. Follow the on-screen prompts and provide the required information.
Once you’ve finished setting up Windows 11, the system will finalize the installation and prepare your desktop.
Congratulations! You have successfully installed Windows 11 on your PC. You can now enjoy the new features and improvements offered by the latest version of Windows. By following these steps, you’ll be able to upgrade your Windows XP to Windows 11 without any issues.