
To uninstall Skype for Business on Windows 10, you can follow a straightforward process that will remove the application from your system. Skype for Business, formerly known as Microsoft Lync, is a communication tool commonly integrated into many business environments. If you no longer require its services or want to switch to a different platform, here’s a step-by-step guide to help you smoothly uninstall Skype for Business from your Windows 10 computer.
Uninstall Skype Business on Windows 10
To uninstall Skype for Business on Windows 10, follow these steps:
1. Press the Windows on your keyboard or click on the Start button to open the Start menu.
2. In the Start menu, search for “Control Panel” and click on it to open the Control Panel.
3. In the Control Panel window, make sure you are viewing the options by Category (you can find this option in the top-right corner of the window).
4. Under the Programs section, click on Uninstall a program.
5. A list of installed programs will appear. Locate Skype for Business from the list.
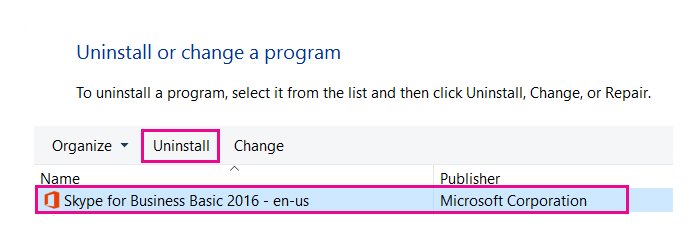
6. Right-click on Skype for Business and select Uninstall. Alternatively, you can also click on Skype for Business once to select it and then click on Uninstall from the top menu.
7. A confirmation prompt may appear asking if you want to uninstall Skype for Business. Click Yes to proceed. Follow any on-screen instructions that may appear during the uninstallation process.
Once the uninstallation is complete, you will receive a message confirming that Skype for Business has been successfully removed from your system.
Skype for Business should now be uninstalled from your Windows 10 computer. If you ever need to use it again, you can reinstall it through the Microsoft Office suite or other appropriate channels.
Uninstall Skype on Windows
Skype is typically a pre-installed application on Windows 10, but Microsoft has been transitioning users to use Microsoft Teams for communication and collaboration. If you still have Skype installed on your Windows system and wish to uninstall it, here’s how you can do it:
- Go to Start in the taskbar.
- Scroll through the list of installed applications and locate Skype.
- Right-click on Skype and select Uninstall.
Follow any on-screen prompts to confirm the uninstallation and complete the process.
1. How to sign in to Skype for Business on Windows 10?
To sign in to Skype for Business on Windows 10, follow these steps:
- Open Skype for Business from the Start menu.
- Enter your username and password, which are usually the same credentials you use for your work or organization’s Office 365 or Microsoft 365 account.
- If your organization uses multi-factor authentication (MFA), you may need to complete an additional verification step, such as entering a verification code sent to your phone or email.
2. How to schedule a meeting via Skype for Business on Windows 10?
To schedule a meeting in Skype for Business on Windows 10, follow these steps:
- Open Skype for Business and sign in if you haven’t already.
- Click on the Calendar icon or go to the Meetings tab in the left navigation pane.
- Click on New Skype Meeting or New Online Meeting (the specific wording may vary depending on your version).
- In the meeting invitation window, add the email addresses of the participants in the To field.
- Set the meeting date, time, and other details like subject, agenda, and location.
- Click Send to send the meeting invitation to all participants.